블로그 글 수정
글쓴이는 자신의 글을 수정할 수 있습니다.
글의 상세 보기 페이지에 접속한 사용자가 글쓴이라면 ‘수정’ 버튼이 나타납니다.
수정 버튼을 누르면 글을 수정할 수 있는 EditView 컴포넌트로 이동하고
EdtiView 컴포넌트에서 글을 수정할 수 있습니다.
글 상세 보기에서 수정 버튼을 누르면 글 수정 페이지로 이동할 때 수정할 글은 가지고 가려고 합니다.
props는 부모 컴포넌트에서 자식 컴포넌트로 데이터를 전달할 때 사용하는 Vue의 기능입니다.
부모 컴포넌트가 데이터를 제공하고, 자식 컴포넌트가 이를 받을 수 있습니다.
Vue Router를 사용할 때 props를 통해 라우트 매개변수(route params), 쿼리(query) 또는 정적인 데이터를 컴포넌트로 전달할 수 있습니다. 이는 데이터 전달을 단순화하고 컴포넌트의 테스트 가능성을 높이는 데 유용합니다.
Vue에서 router와 props를 활용한 컴포넌트 간 데이터 전달 방법
Vue에서는 Vue Router를 사용하여 페이지 이동과 함께 데이터를 전달할 수 있습니다.
params를 이용한 데이터 전달 (URL에 포함)
params는 query와 달리, 동적 라우트 매칭을 사용하여 데이터를 전달하는 방식입니다.
라우터 설정
// router.js
import { createRouter, createWebHistory } from "vue-router";
import ParentComponent from "@/components/ParentComponent.vue";
import ChildComponent from "@/components/ChildComponent.vue";
const routes = [
{ path: "/", component: ParentComponent },
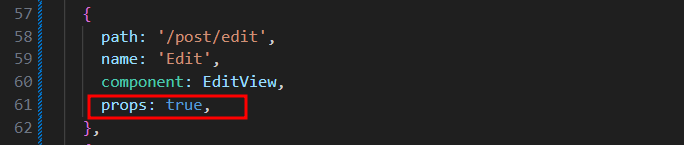
{ path: "/child/:id", component: ChildComponent, props: true } // props 활성화
];
const router = createRouter({
history: createWebHistory(),
routes
});
export default router;- props: true를 설정하면 params 값을 props로 자동 전달
부모 컴포넌트에서 params로 데이터 전달
<!-- ParentComponent.vue -->
<template>
  <div>
    <h1>부모 컴포넌트</h1>
    <button @click="goToChild">자식 페이지 이동</button>
  </div>
</template>

<script>
export default {
  methods: {
    goToChild() {
      this.$router.push({ path: `/child/123` }); // id 전달
    }
  }
};
</script>
자식 컴포넌트에서 데이터 받기
<!-- ChildComponent.vue -->
<template>
  <div>
    <h2>자식 컴포넌트</h2>
    <p>받은 ID: {{ id }}</p>
  </div>
</template>

<script>
export default {
  props: ["id"], // params를 props로 받기
};
</script>- props를 통해 id를 직접 받을 수 있음
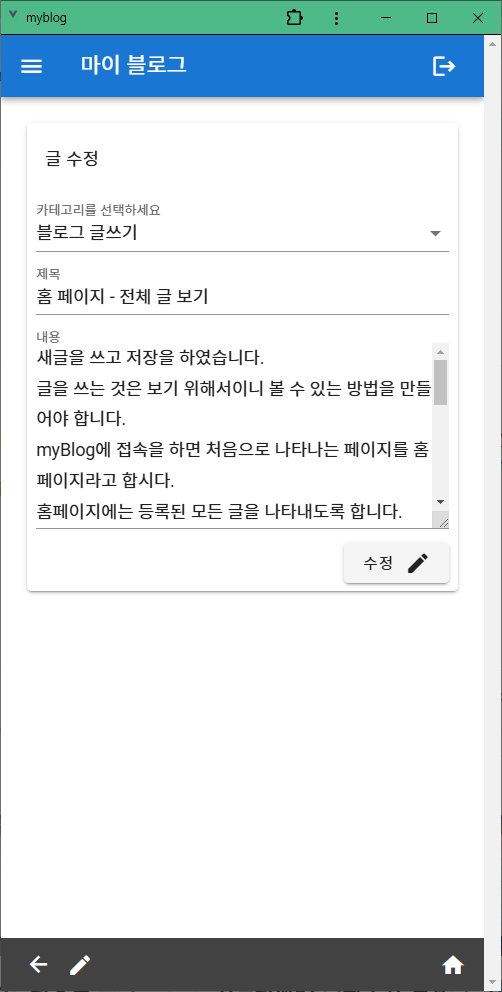
myBlog 글수정
글 상세 보기에서 글을 수정 컴포넌트로 전달 합니다.
글 수정의 경우 작성과 마찬가지로 사용자가 등록한 카테고리를 나타내어 카테고리를 변경하거나
저장된 글의 제목과 내용을 수정폼에 나타내어 수정할 수 있도록 합니다.
카테고리는 로그인할 때 미리 로드 되어 있으므로
페이지가 열릴 때에는 로드된 카테고리에서 카테고리 이름만 배열로 추출하여 셀렉트 박스에 넣습니다.
PostView에서 EditView로 router의 params를 이용하여 게시글 전달하고
수정 페이지가 열릴 때 카테고리와 수정할 글을 받아 화면에 표시합니다.
글을 수정 후 상세보기 페이지로 돌아가면
상세 보기 페이지가 열릴 때 해당 글을 다시 로드하므로
수정된 글이 상세보기에 나타납니다.
Router
PostView.vue

글수정
EditView 컴포넌트 script
EditView 컴포넌트 template
EditView 컴포넌트 script - 카테고리 로드

EditView 컴포넌트 script - 글수정

  // 글수정
  async updatePost({ commit }, { id, post }) {
    const docRef = doc(db, "posts", id);
    await updateDoc(docRef, post);
  },
EditView.vue
<!-- src/views/EditView.vue -->
<template>
<v-container>
<v-card>
<v-card-title style="font-size:1em">글 수정</v-card-title>
<v-form class="pa-2 mt-n2" ref="form" v-model="valid">
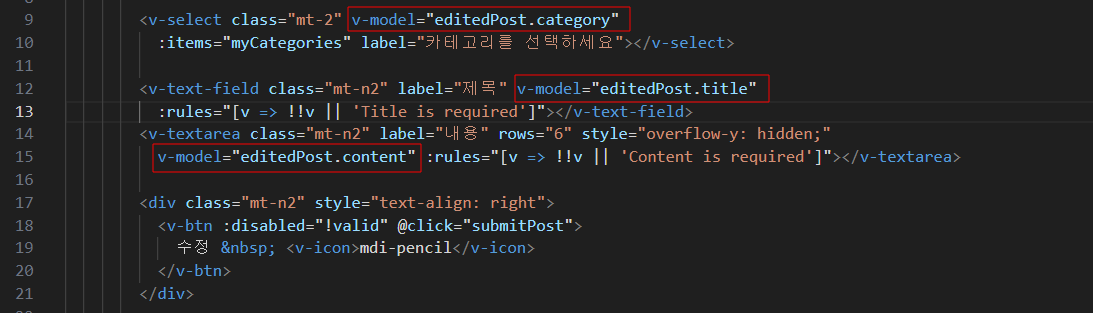
<v-select class="mt-2" v-model="editedPost.category"
:items="myCategories" label="카테고리를 선택하세요"></v-select>
<v-text-field class="mt-n2" label="제목" v-model="editedPost.title"
:rules="[v => !!v || 'Title is required']"></v-text-field>
<v-textarea class="mt-n2" label="내용" rows="6" style="overflow-y: hidden;"
v-model="editedPost.content" :rules="[v => !!v || 'Content is required']"></v-textarea>
<div class="mt-n2" style="text-align: right">
<v-btn :disabled="!valid" @click="submitPost">
수정 <v-icon>mdi-pencil</v-icon>
</v-btn>
</div>
<div class="text-center">
<v-progress-circular v-if="loading" indeterminate></v-progress-circular>
</div>
</v-form>
</v-card>
</v-container>
</template>
<script>
import { mapState, mapActions } from "vuex";
export default {
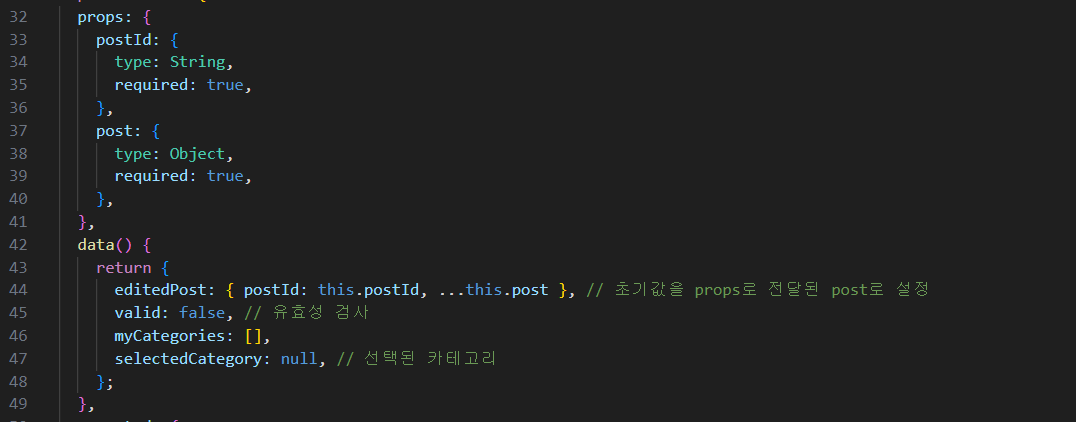
props: {
postId: {
type: String,
required: true,
},
post: {
type: Object,
required: true,
},
},
data() {
return {
editedPost: { postId: this.postId, ...this.post }, // 초기값을 props로 전달된 post로 설정
valid: false, // 유효성 검사
myCategories: [],
selectedCategory: null, // 선택된 카테고리
};
},
computed: {
...mapState('auth', ['profile']),
...mapState('post', ['loading', 'categories']),
},
methods: {
...mapActions('post', ['fetchCategories', 'updatePost']),
async submitPost() {
if (this.$refs.form.validate()) {
await this.updatePost({id: this.postId, post: this.editedPost});
// 업데이트 후 상세 보기 페이지로 돌아감
this.$router.push({ name: "Post", params: { id: this.postId } });
}
},
},
async mounted() {
// 카테고리를 로드한다.
await this.fetchCategories({userId: this.profile.userId});
this.myCategories = this.categories.map(category => category.name);
},
};
</script>'토이 프로젝트 - Vue, Firebase로 서버리스 PWA 개발' 카테고리의 다른 글
| 21. 서버리스 PWA myBlog 개발 - 게시글 댓글에 대한 답글 (0) | 2025.02.26 |
|---|---|
| 20. Firestore로 PWA myBlog 개발 - 댓글 쓰기 (0) | 2025.02.25 |
| 18. Vue(with Vuetify)와 Firebase로 서버리스 PWA myBlog 개발 - 블로그 글 상세보기 (1) | 2025.02.22 |
| 17. Firestore로 PWA myBlog 개발 - 블로그 글 상세보기 기능들 (0) | 2025.02.21 |
| 16. Vue(with Vuetify)와 Firebase로 서버리스 PWA myBlog 개발 - 홈페이지 (0) | 2025.02.20 |